Color Corrections in the Darkroom
Evaluate the Print’s Color
Once you have printed a full-size trial photograph at the correct density, evaluate the print’s color. Assess the print under the same type of light source in which you will ultimately present it. If the presentation venue is not known, use daylight. Look for color casts that you can identify as red, green, blue, cyan, magenta and/or yellow. For example, the cast may be greenish, which indicates the presence of too much green. Or the cast may be purplish, which would indicate the presence of excess magenta and blue. Usually areas of the print that should be neutral gray are easiest to evaluate.
Instead of trying to identify a cast from six possible colors, you can halve the possibilities by determining whether the cast is warm or cool. On our color wheel, the warm colors are at the right of the vertical axis (magenta, red and yellow) and the cool colors are at the left of the axis (green, cyan and blue).
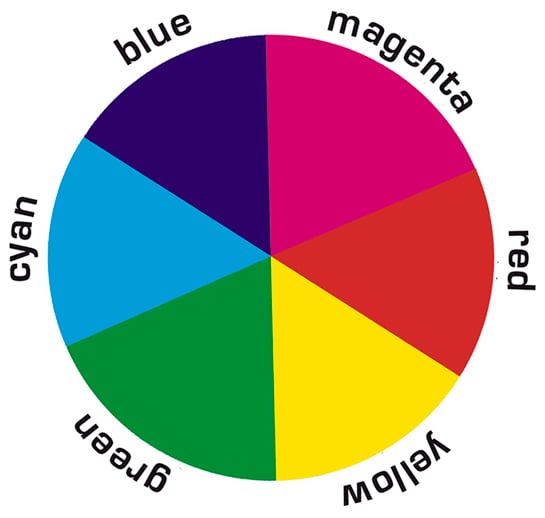
illustration: Additive / Subtractive color wheel. Complementary colors (example: magenta and green) are opposite one another.
It may be difficult at first to distinguish the difference between colors, especially between red and magenta, between cyan and blue or between yellow and green. Colored viewing filters are filters sold in kits with one filter for each of the primary additive and subtractive colors. Each filter has three windows, each with a different strength of that hue. When printing color negatives, always hold the white side of the filter card toward you to view the print. Looking at a print (especially white areas of a photograph or a corrected print) through colored viewing filters will help you to see what each color looks like as a cast.
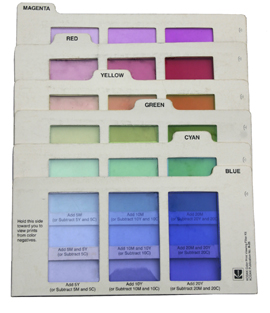
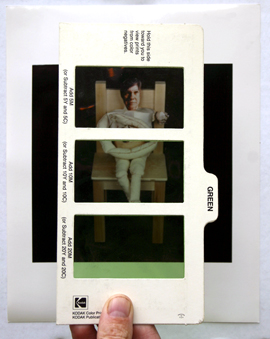
photo left: Color viewing filters. photo right: Viewing print through color viewing filter.
Locate the Filter that Corrects the Cast
The filter that is the complement (opposite) of the excess color will neutralize the cast.
If the cast is: Magenta View through this filter: Green
Yellow Blue
Red Cyan
Green Magenta
Blue Yellow
Cyan Red
Hold one window of a viewing filter three or four inches from your eyes and about eight inches away from the print. Begin by looking through the lightest strength filter window. Move the filter card in and out of your line of sight. If the filter does not correct the cast, try a higher strength of the same filter or try a different colored filter.
Alternately, if you cannot identify the hue of a cast through visual assessment, experiment by looking through different filters until one (or more) corrects the cast. Once a filter corrects the imbalance, you can identify the cast as the complement of that filter. For example, if the magenta filter corrected the cast, you would know that you have a green cast.
Determine the Strength of the Cast
Once you have identified the cast as, say, green, figure out its strength in points. The colored viewing filters are marked with the filter point system that corresponds to the filter points on your enlarger color head. Spend some time looking through each of the filter’s three windows, beginning with the lightest and ending with the darkest. Once you have determined which strength corrects the cast, look at the bottom of that filter window for the number of filtration points necessary that must be changed. For example, if the middle window of the magenta filter corrected your green cast, the card reads Subtract 10M (i.e., subtract 10 points of magenta filtration). The first window, (subtract 5M) would be too little of a correction and the last window (subtract 20M) would be too much. Often, the amount of filtration needed will fall between windows. For example, you may only need to subtract 8M.
Enlarger Color Filtration
Once you know the color and strength of the cast, you can adjust the filtration in the enlarger to correct the imbalance. While it is possible to print color on a black and white enlarger by placing individual CP or CC filters, enlargers with a dichroic head for color printing are more common. Dichroic heads contain three filters: cyan, magenta, and yellow. Each can be adjusted separately. Collectively, the filters are known as the colorpack.
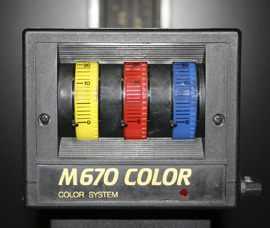
photo: Dial-in color head with three filters (each set to 0).
Because the filters age and fade, they differ from one enlarger to another. For example, 70Y, 70M, 0C on one enlarger may be 60Y, 55M, OC on another. Hence, the numbers that we recommended as the starting point (60Y, 50M and 0Y) are fairly random (save for the 0C). The filtration of each color enlarger varies depending upon the type of enlarger, its age and the age of the bulb. If you print consistently on the same enlarger, you will determine a good set of values for that particular colorpack when color correcting a new print.
Avoid Neutral Density
In Making a Color Enlargement, we recommended setting the cyan to 0, the magenta to 50 and the yellow to 60 before making the test and trial prints. We chose these settings because one of the three subtractive colors must be set to 0 in order to avoid neutral density. Neutral density is gray light resulting from equal quantities of cyan, magenta and yellow light. For example, in the illustration to the left (cyan: 10; magenta: 60; yellow: 70), the lowest common denominator (in this case, 10 points) produces gray light that does not affect the color but does increase the required exposure time (as you increase filtration, you must increase exposure to maintain the same density).

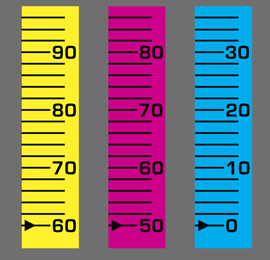 illustration left: Filtration set to Y-70, M-60 and C-10 has 10 points of neutral density.
illustration right: Filtration set to Y-60, M-50 and C-0 has the same color effect as illustration left, but no neutral density.
Neutral density is why one of the three subtractive filters must always be set to 0. Setting cyan to 0 is the industry standard and instructions on the colored viewing filters are based on this. They will direct you to “Add 5M” or “Subtract 10Y and 10M”, rather than adjusting the cyan. Only change the cyan if you subtract so much magenta or yellow that either the Magenta or Yellow reaches 0 (this sometimes occurs when printing cross-processed film). At that point, you can switch to the notes in parentheses at the bottom of the filter cards (which give adjustments for the Cyan).
Change the Enlarger Color Filtration
Once you have figured out your trial print’s color cast (for example, green) and the adjustment that will neutralize that cast (in our case, subtract 8M -- 8 magenta), make the adjustment to the filtration in your enlarger. In our case, the trial print was made at 60Y, 50M, 0C, and the corrected print will be made at 60Y, 43M, 0C. Rarely is a print corrected with one adjustment. You will need to reevaluate the print, make another change to the filtration, and so on.
It is often easier to make large adjustments (20 or more points). Even if you overcorrect the print and create a cast in the opposite hue, you will have a sense of the boundaries of the correction and can then work your way back with smaller adjustments. After processing, washing and drying each print, note its filtration in pencil on the back (ex: 60Y, 43M); this will allow you to jump back to any stage. If you begin to have trouble “seeing the color”, give your eyes a break or find someone else who can offer a fresh perspective.
Reevaluate Image Density
Increasing filtration blocks light; decreasing filtration allows light to pass more easily to the print. As a result, as you change the filtration, the image density may change. As a general rule, for every 10 points of filtration you add, add one second of time to the total exposure. For every 10 points of filtration you subtract, subtract one second from the exposure. This guide varies according to the color; for example, adjusting the yellow affects exposure less than changing the magenta.
Make Final Changes to the Print
Add or subtract local exposure by dodging or burning. Spot the print if there are dust spots or scratches.
Reprints
Take notes about the enlarger height, exposure, aperture size, color filtration and dodging and burning instructions in case you stop printing midway through a correction or if you plan to make additional prints in the future. Remember that the enlarger lamp and processing chemistry may change from one day to the next, so don’t expect to make your notes to produce a perfect print if there is significant lag time between editions. You will probably need to make some changes to filtration and exposure. Likewise, if you open up a new box of color printing paper, produced by a different manufacturer or in a different batch, expect that the color balance will shift.