Camera Raw 5.4 Interface
By opening your digital images in Adobe Camera Raw, you can make adjustments to aspects such as resolution, color and tone with no loss of image quality. The following diagram and text describes the options you will find in the Basic tab of Camera Raw 5.4.
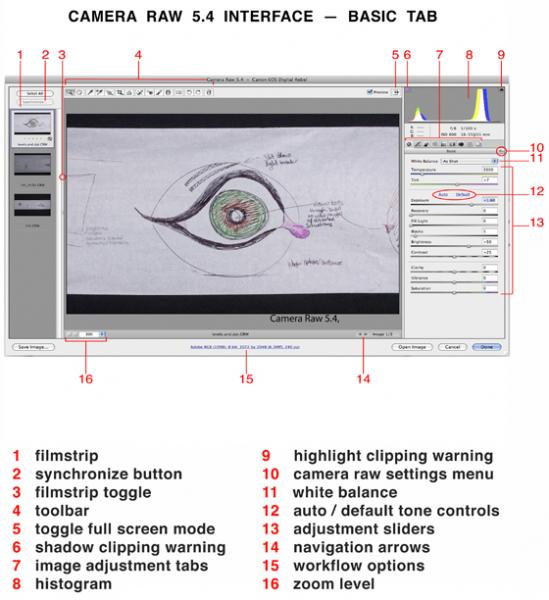
(1) filmstrip: allows you to view multiple images. Open multiple images through Adobe Bridge or the Open dialog box. Click at the bottom of an active thumbnail to apply star ratings.
(2) synchronize button: allows you to apply settings to other images.
(3) filmstrip toggle: allows you to increase or decrease the size of the filmstrip and preview areas.
(4) toolbar: provides tools such as the Zoom tool (for zoom in on particular areas), the Hand tool (for moving the image within the preview window), the White Balance tool (to identify objects that should be white or gray), Color Sampler tool (to place up to nine color samplers in the preview image), the Crop tool, the Straighten tool, the Red-Eye Removal tool, and the Rotate Image tools.
(5) toggle full screen mode: Full Screen fills the monitor screen with the Camera Raw interface. Press toggle button to move between full screen and a smaller window.
(6) shadow clipping warning: Turn on clipping with the arrow to watch where you are clipping or bringing back information (Fill Light sliders). Spiked columns of blue indicate clipped shadows.
(7) image adjustment tabs: open up tabs for other menus such as Tone Curve, Split Toning, and Camera Calibration. The Tone Curve is especially helpful as the sliders show how Curves deals with darks and lights and how lightening or darkening an image affects the curve.
(8) histogram: shows the exposure along the tonal scale and reveals shadow and highlight clipping at the end points of the histogram. The histogram is made up of red, green and blue color channels. As you change the settings in the Basic tab, the histogram changes to reflect the adjustments. Hover the pointer anywhere in the preview image and you will see the red, green and blue values of that pixel displayed below the histogram.
(9) highlight clipping warning: Turn on clipping with the arrow to watch where in the image you are clipping or bringing back information (Recovery sliders). Spiked columns of red indicate clipped highlights.
(10) camera raw settings menu: Allows you to save adjustment settings and apply them to future images.
(11) white balance: corrects color cast by applying the white balance setting. Within the menu, As Shot uses the camera’s white balance settings, and Auto asks Camera Raw to analyze the image and apply adjustments; other settings are based on lighting conditions.
(12) auto / default tone controls: Click Auto and Camera Raw prompts an automated adjustment to color and tonal settings.
(13) adjustment sliders: allows manual adjustment of tone and color by dragging slider or typing in a number rating. Temperature sets a color temperature and Tint adjusts for green or magenta casts. Exposure changes image brightness, Recovery recoups highlight details, Fill Light salvages shadow detail, Blacks lets you change the black level to increase the range of black areas, Brightness modifies brightness or darkness, and Contrast. Clarity increases contrast, Vibrance adjusts saturation variably, Saturation adjusts saturation uniformly.
(14) navigation arrows: when multiple images are open in Camera Raw, click the arrows to change which image is active.
(15) workflow options: determines the color space, bit depth, pixel dimensions, print resolution and other aspects of images saved from Camera Raw.
(16) zoom level: allows you to select a magnification percentage.
photo credit: Claire Harold. Adobe product screen shots reprinted with permission from Adobe Systems Incorporated.