On this page
Brulée
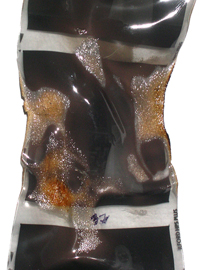
The photographic technique, brulée, French for burning, involves intentionally setting a negative on fire. Heat melts the emulsion, causing the negative image to dissolve and the film to warp. While certain parts of the image can be targeted with the flame, the results are difficult to predict or control. This uncertainty is one reason why the technique was embraced by Surrealist photographers. Though surrealist imagery is often regarded as fantastical, the Surrealists’ molten images mirrored the scorched human and geographical landscape following World War I. Veterans of the war, the first to use heavy artillery, bore injuries that resembled the look of a brulée print.
The burnt negative itself is significant, both as an interesting residual object and as a compelling sacrifice. Because the method entails mutilating the film, the negative must be forfeited. Once burnt, there is no turning back. The source of the image is simultaneously destroyed and created. In contrast, Adobe Photoshop’s ability to reproduce endless “negatives” and to “undo” any action, does not require this sacrifice. The digital brulée technique here only recreates the look of the original method, not the philosophical consequences, that is, being willing to rely on chance and to sacrifice the original.
Darkroom Brulée
Burn a negative with a flame. A lighter will allow you to burn for a longer duration and will allow you to target specific areas. The film will burn through several stages: warping to melting to bubbling. You may court chance or you may want to retard the flame at a precise point in order to obtain certain characteristics. To print the image, carefully place the negative in the negative carrier to avoid tearing the warped areas of the negative.
Digital Brulée
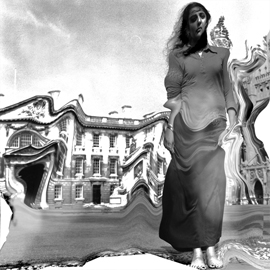
Brulée’s warped look can be simulated digitally with the Liquify filter (Filter > Liquify). Liquify has its own set of tools, which allow you to selectively melt, pucker, twirl and distort the image, with different intensities and brushes. The bleached look of brulée can be obtained by using the Burn and Dodge tools or by altering the contrast with 1) Brightness/Contrast (Layer > New Adjustment Layer > Brightness/Contrast), 2) Levels (Layer > New Adjustment Layer > Levels) or 3) Curves (Layer > New Adjustment Layer > Curves). Other effects of the burnt negative (the crackled and pierced emulsion) can be simulated with digital paint brushes and smudge tools.
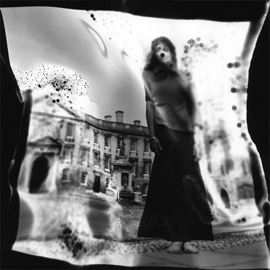
Solarization
Solarization, also known as the Sabatier effect, reverses portions of a print’s tones. In the traditional darkroom technique, the negative is exposed and developed, then re-exposed to light in order to fog the highlight areas, reverse the middle values and create white glowing borders between light and dark areas. The effects are most visible when practiced on images with high amounts of contrast. Man Ray and the New Vision photographers popularized the technique, hoping that its disorienting effect would shock viewers into reexamining their surroundings.
Darkroom Solarizing
Expose a negative for the necessary amount of time, as if you were making a straight print. (Some practitioners suggest exposing this initial print with a high contrast filter [#5], while others recommend using this filter during the second exposure with white light.) Place the print in the developer. After the print has been in the developer (for the full amount of time, or at least until rich blacks appear), place it back under the light (without a negative) for an additional exposure (start with 3 seconds, evaluate your results and change your re-exposure time if necessary.). Place the print back in the developer. Just before the print begins to turn all black, it will solarize. Remove from developer after the glowing white borders appear, but BEFORE the print turns muddy. After developing, continue processing steps as usual.
Digital Solarizing
Solarizing creates the appearance of high contrast, a mix of negative and positive values and glowing white borders. Digital photography offers multiple ways of producing these qualities. While Photoshop does have a Solarize filter (Filter > Stylize > Solarize), this option does not allow you to play with the amounts of contrast, image reversal, and outlines. To control these features, you may want to use other tools. Levels (Layer > New Adjustment Layer > Levels) allows you to modify an image’s high-, middle-, and low-values and Brightness/Contrast (Layer > New Adjustment Layer > Brightness/Contrast) allows you to alter the image’s contrast. To change a positive image to a negative, choose Layer > New Adjustment Layer > Invert. To create white borders, use the Glowing Edges filter (Filter > Stylize > Glowing Edges). These applications may be applied to selective parts of an image layer or to the whole layer. To convert a color image to black and white prior to applying any of these solarizing effects, choose (Layer > New Adjustment Layer > Black & White).
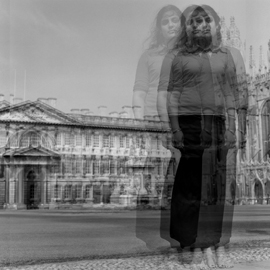
Double Exposure
Double exposure or combination printing combines two exposures on top of one another. In the darkroom technique, double printing involves printing a negative and then moving the negative or the easel (paper) and reprinting. Combination printing combines images from at least two negatives by sandwiching the two negatives and exposing them together or by printing one negative, changing the carrier and printing another. More complicated techniques involve printing with masks, specially shaped pieces of cardboard that allow you to superimpose parts of one negative into parts of another. The ability to place several images on one plane is the specialty of programs like Adobe Photoshop, which allow you to create, move and alter images as separate Layers.
The practice of combining photographic images began in the 1850s when photographers such as Oscar Rejlander and Henry Peach Robinson used several negatives to quilt together a single image. Combination printing was popularized in the 1970s by photographer, Jerry Uelsmann who advocated postvisualization, in which the image was created after the negative had been exposed. Rather than scavenging the physical world for visual material and using the darkroom as a way to reproduce these images, the negatives themselves could be used as raw material and the darkroom could be a place of discovery. By blending images, sometimes seamlessly, images can look fantastical and real, simultaneously. Double printing toys with the most fundamental expectation of photography: that it is truthful. In the digital age, where images can readily be combined, fiction and truth can be exploited even more easily.
Darkroom Double Exposure
Because double and combination printing involves several exposures, the hardest task is to figure out how much area and light to expose each time. You may want to make a straight print first in order to have a sense of the negative’s density. Dodging and burning will allow you to expose more selectively. Merging images is especially difficult in the dark when you have to arrange negatives without really knowing how images will line up or fit with one another. Drawing a rough outline of the projected negative on a piece of paper will help you to position masks or burning and dodging tools.

Digital Double Exposure
Digital double exposures are easier to control than darkroom versions. Images can be copied and moved using Layers, transparent planes that can be repositioned, edited and deleted without disturbing the other layers. To digitally double-expose the same image, use the Duplicate Layer command (Layer > Duplicate Layer). This will create a copy of the image on a new layer directly on top of the original. Open the Layers panel (Window > Layers) and click on a layer in order to modify it. The active layer will be highlighted when it is selected.