On this page
Color Photographic Paper
Photographic printing papers are coated with light-sensitive emulsion. Emulsion is sensitive to different waves of light depending upon whether the paper is meant for color or black and white printing. Color papers are made up of three emulsion layers, each sensitive to a different wavelength of light. As color papers are sensitive to all lights, they must be handled with care in a pitch-black darkroom or with very dim and obscure amber safelights. All photographic papers come packaged inside a light-proof black plastic bag inside a cardboard box. Make sure to keep paper inside the sealed bag and box at all times, especially when printing in a community lab where someone might turn on the white lights without warning. Color paper that is accidentally exposed to light will be fogged. Fogged paper is unusable as it produces a gray or colored veil in affected areas. Handle paper by the edges and corners. Do not bend (paper will crease) or touch the image area (fingerprints will be permanent). Fingerprints are more likely to show up on glossy paper. If storing unused paper for long periods, seal tightly and place the box in a refrigerator or other cool location. Allow the paper to return to room temperature before printing.
Like color film, color paper consists of three emulsions, each one responding to one third of the spectrum. Unlike film, color paper has no orange mask. Choose the appropriate color photographic paper for the process you are using: either Color Negative Paper or Color Reversal Film. Color negative paper is meant for the negative-to-positive process. These papers will have names ending in -color, as in Agfacolor or Kodak’s Ektacolor. Color reversal films are meant for enlarging slides on transparency in a positive-to-positive process. These papers have names ending in -chrome, as in Ilfochrome. The processes for printing positives are highly toxic and so usually handled by commercial labs. These negative and positive processes are increasingly being replaced by digital color printing. If schools or community darkrooms offer color darkroom facilities, they will use the color negative process.
Color photographic papers are resin-coated so the paper will have a plastic lamination. With proper processing and storage, color papers will not shift color, fade or crack for around 30 years.

All color printing papers share the following characteristics:
Each brand of color paper tends to reproduce certain colors differently. The variations are slight and are not advertised, but you may notice that one brand prints a little warmer or cooler than another or that certain colors are more or less vibrant. This is a result of the different dyes and paper base used by manufacturers. Even when using the same type and brand of paper, there may be a slight difference in color from one box of paper to the next. Paper emulsions are produced in batches and may vary from batch to batch. Most boxes show batch numbers if consistency is an issue.
With color printing, image contrast is controlled more through the negative contrast than the paper grade. However, manufacturers usually offer a few choices of contrast grade. These are distinguished by name, rather than by number. For example, Fujifilm’s negative-to-positive papers come in two contrast grades: Type P (the lower grade, so-called for its use in printing portraits), and Super C, which has more contrast and more vivid colors.
Papers are available in matte, semi-matte (also called pearl or luster) and glossy surfaces. Matte papers are less reflective than glossy papers. Glossy papers tend to make the image seem sharper, higher contrast, and with greater color saturation.
Most color papers are medium weight, though each brand will have a slightly different thickness.
Boxes containing sheets of paper come in the following standard sizes: 8×10”, 11×14”, 16×20”, 20×24”, 20×30” and 30×40”. For mural prints, papers are usually available in rolls, which can be as large as 72” x 100’. If processing in a machine processor, check to see the width of the feed tray.
Locating the emulsion-side
Light-sensitive emulsion is coated on one side of the photographic paper. While exposing and processing photographic paper, it will be necessary to place the paper on the easel base or in the chemical trays so that the emulsion-side faces a certain direction (up or down, depending upon the situation). Determining the emulsion-side in the dark can be difficult. A few clues to help:
1. Photographic papers are usually packaged with the emulsion-side facing up.
2. Papers tend to curl upward when the emulsion-side faces up, and down when the emulsion-side faces down.
3. The emulsion of color photographic papers will appear bluish-gray under the safelight.
4. Papers with a glossy surface will have a slight shimmer to the emulsion-side.
Methods and Chemicals
After exposure, negative/positive color papers are processed in chemicals and a sequence similar to color negative processing: color developer, bleach-fix, wash and stabilize. Follow the manufacturer’s instructions for chemical solutions, processing times and temperatures. Unlike black and white processing, which is usually done with tray processing, color prints are processed in either a drum or in an automatic color print processor. Drum processors are cylindrical tubes that hold the paper. You pour in the chemistry and rotate the drum (either by hand or with a motor base) to agitate. Drums can usually only handle prints up to 16×20 inches. An automatic processor is a better alternative, though more expensive and harder to maintain. The automatic processor contains several baths of chemistry (one for developer, one for bleach/fix) and sometimes, two water baths and fans for print-drying. The print is inserted into one end of the machine, pulled by rollers along a track through the different baths and exits the other end processed and, with some machines, washed and dried. Colleges and universities that offer darkroom color printing facilities will usually have a processor. Otherwise, you can often rent lab time at a processor in a community darkroom.
Sensitivity of color paper
Because color printing papers are sensitive to all colors of light, handle paper carefully. Any of the following could fog the paper: safelights that are too close to the paper, the display of an illuminated timer, light leaks in the lens or enlarger negative carrier, or reflections from shiny or bright clothing. Be especially cautious and considerate when printing in a gang darkroom; shield your paper from light as you walk to the color processor and do not turn on your enlarger light if you know that someone else’s unexposed paper is nearby. Fog will appear as a cyan stain in the white borders and highlight areas of the print.
Machine processing
When using an automatic machine, do not tear paper or insert pieces that are too small. Paper test strips must be long enough to pass from one roller to the next. If the strip is too short, it will get stuck in the track and jam the processor. Paper with torn edges, rather than cut with scissors, may also get stuck.
Color photographic papers have a bluish-cast when wet. Some automatic color processors are dry-to-dry processes; the print is inserted when dry, processed, washed, dried and then exits the machine ready to evaluate. Others are dry-to-wet and must be washed and dried before evaluating image density and color.
Safety issues when handling chemicals
Read manufacturers’ literature about possible hazards and ways to handle problems. Wear gloves when handling any chemicals, safety glasses when working with solutions that could splash, and a mask when working with powders. Work in a well ventilated space and wash your hands during and after contact with materials. Dispose of all materials according to manufacturer’s instructions.
Evaluating a Color Contact Sheet
See the book for instructions on how to make a contact sheet. When evaluating a color contact sheet test print, look for an area in which the edge of the film stands out from the black of the paper. Color casts (a tint of one color over the whole image) may make it hard to distinguish the density. Evaluate neutral (or midtone) areas rather than highlight or shadow values.
Making a Color Enlargement
Make a test strip
Set the Cyan to 0, the Magenta to 50 and the Yellow to 60. Make a test strip for the enlargement. A test strip is a print with multiple exposures. The test strip gives a range of exposures to choose from when determining the correct printing time.
Place a piece of photographic paper (a strip, roughly 3×8 inches) emulsion-side up on the easel. Position the strip within a part of the image that has highlights, midtones and shadows. This will allow you to determine exposure from a range of tones.
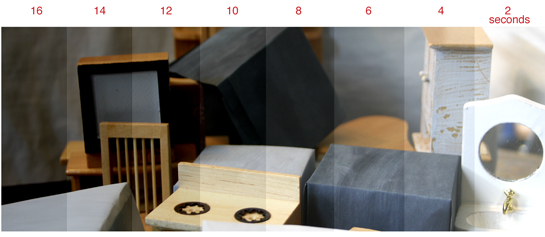
Hold an opaque board an inch above the paper, shielding all but a 1” section. Press the timer button to trigger the enlarger light. Keep the board still while the paper is exposed for 2 or 3 seconds. When the light goes off, do NOT remove the paper, but move the opaque board to reveal another two inches of the paper. Press the timer button again. Continue this series of actions until the entire strip of paper has been gradually exposed. For example, if you made eight 3-second exposures on the strip, the print will have eight areas of differing density in 1” increments from 3 to 24 seconds. The ideal final exposure should be between 12 and 20 seconds as a minimum of 12 seconds will give time to dodge and burn. More than 20 seconds is unnecessarily long.
Process the strip.
Evaluate the test strip
Evaluate the test print for density. Dry the test print before assessing its density. Look at the test print in the type of light under which it will be viewed.

If the shortest exposure (2 seconds in our color print below) is too dark, the entire test print is overexposed. Close down your aperture two stops and make another test print. If the longest exposure (16 seconds in our color example) is too light, the entire test print is underexposed. Open up your aperture two stops and make another test print.
Color test strips may have a cast that makes it difficult to assess the density, but try to overlook this and find an exposure that has good midtone values, shadows with detail and highlights with detail. With both black-and-white and color, it is not necessary to have an exposure that yield a full range: light areas, dark areas and midtones, unless you want this range in tonal values. The tonal range of the print should correspond to the conceptual goals of that image.
Ideally, the correct exposure should be a middle band of the test strip so that the darker band shows how highlight areas of the subject will look if “burned”. A lighter band shows how shadow areas will look if “dodged”.
Make a final enlargement
Reset the timer for the optimum exposure. If necessary, re-clean and re-focus the negative. Place a full sheet of paper in the easel. Expose a full-size trial print. Process. Evaluate. Does the color print have good density in the midtones and detail in highlight and shadow areas?

If you are satisfied with the density of the print, begin to consider color and other qualities. Most prints are not straight prints (made with the same overall exposure at initial color settings). Usually, a print requires some degree of manipulation to emphasize particular aspects of the image. Once you have made the initial enlargement at one exposure, evaluate the print to determine:
- Is the print focused correctly?
- Are there dust particles creating white spots on the print. If dust cannot be cleaned from the negative, see the book for Retouching Images.
- Are you happy with the printing paper? See the web resource Color Photographic Papers for other options.
- Are there particular areas of the print that should be lighter or darker? During the exposure, you may need to burn and dodge areas of the print that are too light or dark. See the book for Burning and Dodging.
- Are you satisfied with the color balance? You may need to adjust the image color. See the web resource Editing:Color Correcting in the Darkroom.
Keep notes about final settings for your print: the aperture setting, print time, dodging and burning process, color settings, etc. With these notes, you can, in the future, make additional copies without having to start the process from the beginning. During a second run, try to work with the same variables: for example, use the same enlarger and the same lens. The chemistry will fluctuate from day to day. Though automatic color print processors constantly replenish the chemistry, its makeup changes from day to day. Though printing at the original settings will get you fairly close, expect to make fine-tuning adjustments.